It is common practice with off-road vehicles to add a variety of accessories, many of which require power. Whether you’re adding a CB, trail lights, axle lockers or something else, taking a little extra time can prevent you from having to troubleshoot a rats nest in the middle of an obstacle out on the trail.
This article is not a comprehensive course on vehicle electrical systems, but rather a series of tips and tricks to help make your accessory wiring manageable.
Sourcing Power
The most common means of sourcing power we see under hoods is to connect accessories directly to the battery or to splice into an existing circuit in the vehicle. These are probably the least favorable options with a few exceptions.
Ground
With a few rare exceptions (usually antique European cars), all vehicles are negatively grounded. That means the negative terminal of your battery is wired to the vehicle’s chassis, such that the entire chassis is grounded. This is easily verified, as there is usually a large gauge wire running from the battery to the vehicle’s body and often to the engine block as well.
Whether you’re working under the hood or under the dash, there are usually several terminal bolts to which other items in the vehicle are grounded. These are excellent points to connect your accessory ground to. Failing access to one of these, Just about any bolt connected to your frame or body will do as long as there aren’t layers of paint to prevent the connection.
Direct to Battery
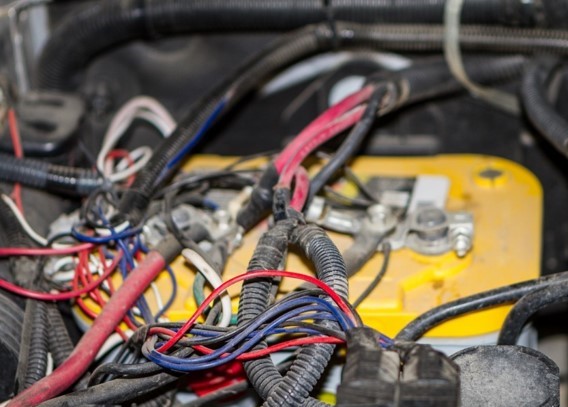 In general, the only accessory you should wire directly to the battery is a winch. Some CB radio and car audio manuals will suggest you do just that, but there are other options to consider. There are two concerns with this approach. Often people neglect to insert a fuse between the accessory and the battery terminals become a virtual web of connections making them difficult to manage and a nightmare if you ever need to replace your battery.
The exception to this is a winch. Because of the high current draw required by a winch, it is best to go directly to the battery for the positive side of the connection. For the negative, connect to the chassis.
Splicing into Circuits
It is tempting, at times, to simply splice into an existing circuit that you know has power. This can be an easy option for low power devices, such as a GPS or to power illuminated switches, but unless you know exactly how much current the accessory will draw, you may be overloading that circuit and wind up blowing fuses. The common solution to that is to install a larger fuse, but then the issues that fuse was intended to protect from could cause real damage to your vehicle or accessories if something goes wrong.
Add-a-Circuit
 These clever devices are available at just about any auto parts store and through several online sources. To use them, you replace an existing fuse in your vehicle with the add-a-circuit which then provides a fuse slot for the original fuse and a second slot for the accessory you’re adding. These are warranty friendly and don’t require you to cut into your vehicle’s wiring harness.
Power Distribution Panel
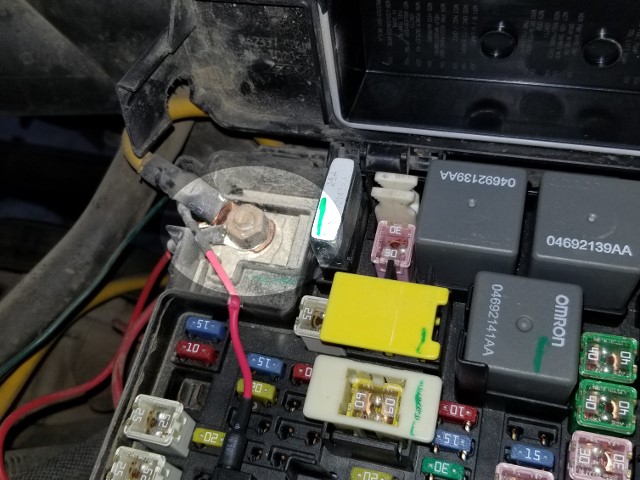 In most vehicles, there’s a master fuse panel under the hood. It is usually near the battery and has a heavy gauge wire running from the positive terminal of the battery to a terminal bolt. That bolt is an excellent place to source power, especially if you plan to add an auxiliary fuse block, as discussed below.
Be aware, this is direct battery power. There are no fuses protecting this connection, so ensure you add a fuse in line with your circuit unless you’re going to an auxiliary fuse block.
Auxiliary Fuse Block
 If you’re going to have several accessories, then adding an auxiliary fuse block is the best option. You can either salvage one a a wrecking yard or buy one. There are several options out there, but it is recommended you select one that has a common input bus (There’s one power input that provides power to all the fuses). Make sure you know the current capacity of the panel and don’t exceed it!
This approach usually requires a single power connection from the battery or preferably the power distribution panel to the fuse panel then provides terminals or wires to connect to your various accessories, each protected by their own fuse.
Wire Size
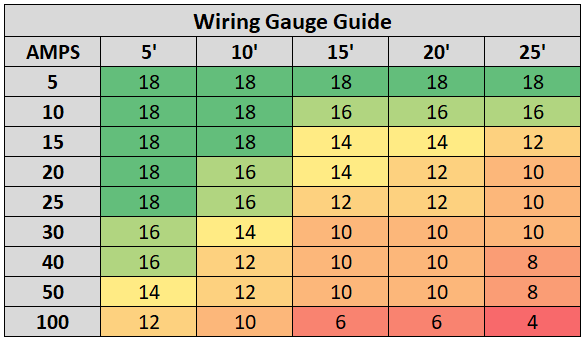
It is important, when planning your project, that you pick a wire size appropriate for what you’re connecting. In general, the more power required and the farther it is from the power source, the larger the wire you will require. A Google search will easily turn up automotive wiring gauge tables. Some of them are published by wire suppliers, so they tend to over-engineer things, but in general the wires that come with your accessory are a good guide or you can refer to the chart below.
This chart shows the minimum wire gauge that should be used given the expected current draw and the length of the run. The length should be calculated from source to load. For example, if you have 10 feet of wire running from the battery to a switch and 15 feet from the switch to the load, that’s 25 feet of wire. When estimating, round up. Safer to have larger wire than have something too small. You’ll need larger wire as you move from green to red.
Making Connections
One of the common issues we run into on the trail are connections that have come apart. Usually this happens with crimp connectors. While I prefer to solder connections, the connectors or the crimp aren’t usually the problem. Generally, the wires have been run too tightly putting constant pressure against those crimps, and they will eventually pull free.
When you’re running your wires, avoid sharp turns in the wire. The wire will usually survive this, but the insulation tends to be weakened at those tight bends. At either end of the wire, always leave a little slack to avoid continuous strain on the connection. Too much slack will look sloppy, but not enough, and the wire will fail over time.
Soldering
Unless you have a connection that you will need to disconnect, for example to remove a tire carrier, bumper or hood, I prefer to solder connections. Soldering is permanent and the solder joint, if done properly, is usually stronger than the wire itself. A soldering iron isn’t expensive, and when combined with heat shrink tubing, your connections will be clean and professional looking. It takes a bit of practice, but it is the best option.
Crimp Connectors
If you are not equipped to solder, or if you need to make a repair in a pinch, crimp connectors do provide good connections. If the connection is under strain, however, it isn’t uncommon for the wire to pull out of the crimp.
Automotive Connectors
If you look under your hood, you’ll see dozens of automotive grade waterproof connectors connecting everything from sensors to headlights. If you have a connection that needs to be detachable, you can purchase these same connectors and insert them. They are available in some auto parts stores, but they can be bought in bulk on eBay or Amazon at far more reasonable prices.
Switches and Relays
Use Relays
Relays are electrically controlled switches. They usually operate on low current (typically 150 to 200 mA) to switch a higher current circuit. Common automotive relays can switch 30, 40 or 80 amps. Relays provide circuit isolation and provide protection to the operator by allowing the switch to run at relatively safe low current, reducing the risk of serious bodily harm.
Since relays are just electrically operated switches, people often wonder why use them at all? Why not just use a switch big enough for the accessory?
Imagine you’re wiring that 50″ light bar. Assume you’re drawing power from the distribution panel under the hood. You run wire from there, through the firewall to your switch, from your switch back through the firewall and up the windshield to your light bar. That’s probably 20-25 feet of wire for that circuit. If your light bar draws 15 amps or more, all that wire has to be 14 gauge wire.
However, if you install a relay under the hood, the current needed to run that relay is less than an amp, so the wire running to your switch only needs to be 18 gauge and because you’re now running from the panel to the relay (under the hood) and from the relay to the light bar, you’re probably looking at less than 10′ of wire for the actual power circuit, so you can use 18 gauge there as well.
The smaller wire means makes it easier to fish through the firewall, costs less and is generally easier to work with when attaching connectors or soldering. Generally, you want to avoid running high current wiring through the firewall. High current circuits are more likely to heat up and cause fires (rare, but still possible), so best to keep that out of the passenger compartment if possible.
Switches
There are hundreds of switches and switch types. There’s a whole other article just in describing the various switch types, what they do, how they’re wired and when to use which one. For the purposes of this article, suffice it to say, make sure you know what kind of switch you need. For turning things on and off, you usually want a SPST (single pole, single throw) switch, maybe one that’s illuminated. This type of switch will usually have two terminals (source and load) and if illuminated, a third terminal to provide ground (negative) to the lamp in the switch.
Final Thoughts
The most common mistake encountered with accessory wiring is a lack of planning. If you’re only adding one or two things, the Add-a-Circuit route makes perfect sense, but if you know you’re going to have lights, lockers, a compressor and more, then plan ahead and add an auxiliary fuse panel. Take the time to run the wires neatly, color code them if you can, and you will be thankful when it comes to troubleshooting the first time something stops working.