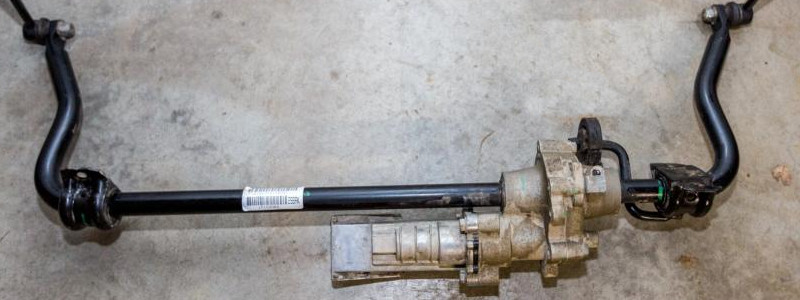
One of the most welcome features of the JK/JKU Rubicon was the electronic disconnecting swaybar, AKA the Smartbar. This handy feature eliminates the need for aftermarket swaybar disconnects and allows you to improve your flex from the comfort of your driver’s seat.
It is one of the envious features of the Rubicon, until you get it wet. Then, any number of gremlins may appear. In fairness, it is generally pretty resilient. The one on my 2008 Rubicon went 9 years without any maintenance before giving me any trouble, but it is a known fact that they do fail, often due to the complex electronics FIAT Chrysler chose to install in such a vulnerable location.
How it Works
Mechanics
Mechanically, the Smartbar is pretty simple. It is basically just like a standard swaybar, but split into two pieces. At the end of each swaybar section, a gear was attached. The two gears are identical with two splines being significantly wider than the rest so that the swaybar can only reattach in one position (well, technically two positions, 180 degrees apart, but if your swaybar rotates that far, you’ve got bigger problems). A collar, attached to a shift fork, meshes with splines on each side to connect the swaybar in the normal position.
When the swaybar is disconnected a lead screw (basically a threaded rod attached to a motor) pushes the shift fork that slides the collar so that the collar is only making contact with the passenger side of the assembly, allowing the two swaybar sections to move independently. Behind the fork (in the image) there is also a spring loaded plunger that will move in and out with the shift fork, tracking its position (more on that later). Inversely, when the swaybar is reconnected the lead screw is retracted allowing the spring (visible in the image above) to push the collar back into the connected position once the two swaybar sections are properly aligned.
Electronics
This part gets a little trickier. I haven’t fully reverse engineered the circuit, but the basic functionality is pretty straightforward, making the overly complicated electronics in there even more baffling.
The circuit has four major components. First, there’s a Canbus interface which allows the Smartbar to communicate with the vehicle’s MCU. When you push the swaybar button on your dash, data messages are sent to the Smartbar over Canbus to either connect or disconnect (other conditions may also trigger these commands, such as taking the vehicle out of 4Lo). The Smartbar, for its part, will respond with messages identifying the state of the Smartbar (connected or disconnected).
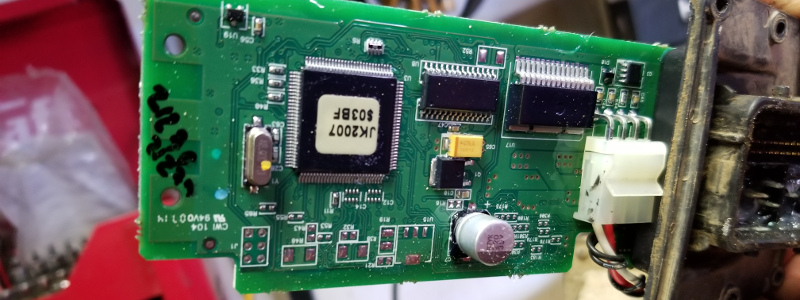
When a command is received to disconnect the swaybar, the Smartbar will activate our second component, the motor (attached to the red and white wires). The motor is only activated for a few seconds to extend the lead screw, putting enough pressure on the shift fork to overcome the spring on the far side, eventually causing the swaybar to disconnect.
Our third component keeps the swaybar disconnected. A small coil inside the motor mechanism (attached to the two black wires) acts as a brake, keeping the lead screw extended. When the command is received to reconnect the swaybar, power to the coil is removed and a clock spring automatically retracts the lead screw.
A hall effect sensor is our fourth component (attached to the backside of the board), and its job is to track the position of the shift fork. The hall effect sensor detects a magnet attached to a spring-loaded plunger that effectively follows the shift fork back and forth allowing the computer to track its position. Whenever you see your the swaybar indicator on your dash flashing, it’s because the swaybar isn’t in the position the MCU expects it to be in.
Maintenance
The following are the primary areas of care required to keep your Smartbar functioning.
Shift Fork Housing
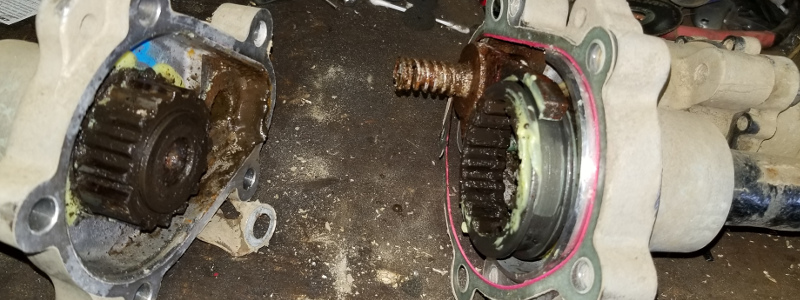
Since both halves of the swaybar enter the housing through a seal similar to an axle seal, it’s not surprising that water will work its way in over time. Service of this housing is primarily a matter of regular cleaning and greasing. Remove the 5 15mm bolts holding the housing together and an additional 15mm stud attached to the rubber hanger for the housing. Make sure you keep the gasket, as it not only seals the assembly, but also acts like a spacer. Without it, the whole thing binds up.
With the housing split, take care not to lose the spring, as it supplies the force required to reconnect the swaybar or the washer that sits between the two gears. Using a combination of shop towels and brake cleaner, remove any dirt, mud, rust, and water from the housing, taking care to ensure the splines in the gear are clear of any debris. Using a wire brush, clean the shift fork and the splines of the collar, removing any rust and dirt.
Once everything is clean, apply white grease to the splines, the fork, and the collar to ensure smooth movement of the mechanism. I used white grease in an aerosol can for easy application. Also ensure that the plunger moves in and out freely before reassembling the housing. I found it easier to reassemble with the driver’s side swaybar mounted in a vice so that I could drop the passenger side half onto it for easier alignment. Remember to rotate the two sway bar halves so that they are aligned the same way.
Motor Housing
The motor housing is attached to the shift fork housing with 15mm bolts. Remove the motor housing to clean the end of the lead screw and plunger. Clean everything with towels or rags and ensure that there is some grease on the end of the lead screw. Before reattaching the housing, consider applying a light layer of RTV seal the mounting surface, although I suspect water usually enters this cavity from the shift fork housing.
Connector
The electronics are all housed inside the motor housing, which is pretty well sealed. Since the housing is riveted closed, I don’t recommend opening it unless your Smartbar is dead. The connector is the real vulnerability to the electronics. Take the time clean the contacts (contact cleaner is the obvious choice here, but rubbing alcohol works too). I also put some dielectric grease in the connector to help prevent further water penetration and corrosion in the future.
Maintenance Schedule
I performed the maintenance above for the first time after 5 years of wheeling, so it has stood up to some abuse. That said, taking the time to do the maintenance about once a year is probably a wise choice, particularly if the Smartbar gets submerged during your travels.